Tuesday, December 5, 2017

First Ever Christmas Post:

Oh Christmas time is here!


Usually I love to shop, but this year I think I will try to make it a completely home made Christmas and forego the shopping. I haven't done that in years, and it is quite the challenge. The decorating is also scaled back...I love the lights and tree and do dads, but I am not going quite so overboard in 2017.


I learned to tat two years ago and tatted sixteen of these star snowflake beauties. Gave most of them away as presents last year! This year I'm doing a different pattern and am planning to give most of them away again. It is so magical that just a simple knot can make something so beautiful.


The house is dressed in traditional colored lights.


The front door deck is decorated with my old sled and red wagon.


The stockings are ready and waiting for Santa.


Handmade coffee filter and Epson salt snowflakes are glistening in the sun.


And quietly falling on the windows.


Shortbread snowflake cookies are baked and ready to eat. YUM! Yes, I will have to make another batch before Christmas Eve. 


My very first quilt is ready to cuddle under with a mug of hot cocoa and a cookie. Then I think I'll settle down to a long winters nap! And just enjoy the sparkle of the season.

Wednesday, November 22, 2017

Thanksgiving Table

Thanksgiving table set: check! Sneak peak and all the details.


This picture does not do it justice, it sparkles so! Love the Fostoria American glassware plates that look like little ice cubes. Both my mom and grandmother (on my dad's side) had a few pieces to which I have added more. Must admit when I was younger I didn't really like the pattern, but it has really grown on me.  American is a discontinued pattern, but they starting making it in 1915 and made it until 1983. Other manufacturers made similar patterns, too. The plates have been used frequently and I was down to only three bread and butter (approx: 6 inch) and five (approx: nine inch luncheon) salad plates. And plates were getting hard to find, at least here in the Pacific Northwest. Thanks to my friend Barb, I've finally filled out all the plates I think I will ever need! 

The china is Lenox pattern Laurent, also discontinued. It is cream colored with a guilt edge. It has the prettiest oval veggie bowl and a graceful gravy boat. These were my mother-in-law's. Sometimes I use the china for breakfast or dinner, not just Thanksgiving, Christmas, and Easter. Stuff should be used and enjoyed.

The crystal goblets are Mikasa pattern Park Lane... guess what ...discontinued. The stainless (my everyday) flatware is Oneida pattern Maestro. Hum, discontinued, too. There seems to be a pattern here. The butter knives are sterling very old with a Greek key pattern similar to my silver-plate by Associated Silver Co. Yourex pat. DEC.17-1918 that you may see in future posts. 

Salt and pepper shakers are old from when I collected salt and pepper shakers. Enough!!!


Hurricane holders (think they are vases) and holiday pillar candles from Walmart. They are still available, but at much increased prices. When I purchased the hurricanes they were only $1.50 each. The pumpkins are from the Dollar Store and they came packaged in a bag with two large pumpkins with stems and a variety of smaller pumpkins with no stems. I made some stems from modeling clay (also the Dollar Store) example: the orange and green one. Like them with stems much better! The hazelnuts I bought for a craft project and some were left over to decorate the center of the table.


HAPPY THANKSGIVING!

Tuesday, November 21, 2017

Falling Leaves Pillow Cover Tutorial

Let's make a pillow and pillow cover, this one for Fall. Don't you just love those colorful silk leaves? I found some two years ago at the dollar store and bought two packages (50 leaves per package). I've used them to decorate - sticking them in wreaths and such. Time to try something different. Introducing the Falling Leaves Pillow.


First I decided on the size pillow I wanted - mine was finished size twenty by ten. Eleven inches by twenty-one inches, including half inch seam allowance, using my handy dandy pattern made from freezer paper.  I love this stuff. Make the pattern, put the plastic side down on your material, iron it with your iron set to the temperature appropriate for the fabric. No pins needed, you just cut around the pattern then pull it off. 


And you can use the pattern again and again! How neat is that? For the pillow form cut two front pieces from neutral fabric, I used an old sheet. Sew around the edges using a half inch seam except for a four inch opening. Stuff it with fiberfill or the inside of an old pillow and then sew it shut. No one but you will see this so don't worry about stains or finishing the edge.


Now cut the front and two backs (11 inches by 12 inches) out of the fabric you have chosen for the pillow cover. How did I decide how to place the silk leaves? I threw them on the floor! (smile)


Then used a section of that for placement on the front fabric piece. Using basting spray I placed the leaves how I wanted or you can just pin them in place before sewing. 


Using my sewing machine, I zig-zaged around each. You could also sew around each leaf using a straight stitch.


Hem one side of each of the two back pieces along the short edge of the fabric. Press the edge a scant quarter of an inch, fold it over again, press again and then stitch.


Finish the cover using french seams. Put wrong sides together and pin for the first seam. From the picture below you can see how the back pieces come together with the hem in the middle of the cover.


Stitch a small seam using your presser foot window (slot where the needle goes through the foot) as a guide. Stitch straight off the fabric with your stitches. At each corner you should have stitching that makes a little square. 


For crisp corners fold as below and turn entire cover to the wrong side. Press seams and then stitch all the way around again a little wider than the existing seam.


Turn using the crisp corner technique.


You are done! I added a little hand embroidery for the stems. By the way the pillow shown below has been washed in cold water twice, the first time by hand and the second in the machine on delicate cycle. I have a dog and the pillow cover is off white...need I say more?


More pillow covers and ideas to come!


Saturday, October 28, 2017

Easy Last Minute Halloween Decorations

Please, please don't stress over Halloween decorations. I have wonderful friends who decorate for Halloween as much as Christmas, and they love it. For me, it is a little much. Here are some ideas you can use that don't break the bank, are simple and fun.

1.
 All you need are: a black sharpie, a pumpkin, and a crow from the dollar store. You could use a spider or a rat or a ghost if you want.

2.

Go and find some fall leaves (or better yet, have the kids or grand kids gather them), throw them in some sort of large container: wheel barrow, wagon or planter. Add a crow (or ghost or rat or whatever) and maybe some small pumpkins and you are done! It is perfect for Thanksgiving, too.

3.

Use your existing decor and just add a crow or pumpkin...you get my drift. It does not have to be perfect or hard. But it should bring a smile to your face.

What did you decide to do?


Friday, October 27, 2017

To clean or not to clean that is the question.

Maggie Mack swabbing out the house:


When my two children were little, it was definitely not to clean. It was always more important to go for a walk, play with the animals, roll in the grass, garden, wash the car, go shopping and such,  plus most of the time I was working full time. Not that we were slovenly (well maybe), rather it was just chaos ALL THE TIME. And we had a lot of stuff - probably stuff we didn't need. Probably stuff we didn't even want. It was just so unorganized. Not enough closet space.  Laundry - wow, there was always a pile to be washed and then folded, then sometimes put directly on a child never making it to a drawer. Money was tight, and with the troupe growing so fast the investment in a lot of clothes was not a possibility. Therefore, more laundry. Endless cycle. We always had one or two shedding dogs or cats or both...hum, probably not the smartest thing, but so worth it. I would much rather be out in the yard gardening or mowing the lawn. For awhile I wouldn't allow myself to garden until the house was clean, the problem with that was the house was still the same and the yard was a mess, too! I just could not get ahead of the cycle.

Today, I don't spend all day Saturday cleaning which is what I did in the "olden" days. Just a few minutes here and there with one to two hours weekly vacuuming and mopping and dusting. Of course the children have grown and left home and I'm no longer working full time. But I cook now, which I didn't do so much of before. But once you can get things in place and manage to put them back in place, it makes keeping things clean so much easier. Well, mostly. 

I keep my kitchen counters clutter free. 


My bathroom counters the same - both the Master Bath 


and Guest Bath.


And I make my bed first thing in the morning as soon as my husband gets out, tee hee. There is still an inordinate amount of laundry...folded and in drawers, with the most recently cleaned item on the bottom...towels, tee shirts and underwear are all treated this way. Okay, you can laugh, I also rotate my dishes and glasses so that they wear evenly. My life is so much calmer. I loved the time that I took to spend with my children when they were young and am very glad that I did. Now I have time to have a lovely clean, calm home and a home with storage galore. I am really enjoying this time in my life! No high drama!

My husband's office is a lost cause...I just don't go in there except to vacuum! The problem area that I have some control over is the craft room/spare bedroom. Still working on keeping the clutter contained. I've tried keeping each project in bag, but that definitely is not working  Are you doing a better job with this than I am? Any ideas? 

Saturday, August 26, 2017

Beautiful Flowers


My friend Wendy gave me these flowers and from her garden (Dahlias and Cosmos)...aren't they beautiful? So now I want to plant a cutting flower garden and I think I have the perfect place. But this will be for next year...though I can start clearing the space for it. 

My plan for the blog was to take a few weeks off and work in the garden. Since the weather had been so bad here, I hadn't really done the spring clean-up work needed. But a few weeks turned into a few months! The biggest challenge I have with the blog is: do I want to post or do I want to craft, or garden, or walk the beach, or sew, or knit, or tat, or crochet, or read, or go to lunch, or go on day trips...you get the picture...trying to find the right balance. 

Saturday, May 13, 2017

Dust Bunnies


Yes, I have proof where dust bunnies come from, look closely just above my logo and you will find one of those little devils. What you don't see in the photo is the spider web spun between the bunnies ears. Oh, my! Makes me want to re-think my bunny collection! (Smile)

I wish all of you a wonderful Mother's Day!

Friday, May 12, 2017

Garter Stitch Bow Tie Scarf in Chunky Weight Yarn

I was going to wait until early fall to do this post, but it has been so cold and wet here that it might just be the thing. Plus I bet this would be lovely in a linen blend or cotton yarn. Sometimes you find a skein of yarn that you really love, but there is only one, or all the skeins have a different lot number. So you just get one skein. Finding a pattern for it is always a challenge. 

Thanks to Bev at The Make Your Own Zone and her Garter Stitch Bow Tie Scarf this is my go-to pattern for Aran (4) medium weight yarn. I have also made it from DK (3) light weight yarn, it worked great.  And there are so many things to love about this scarf, it  is small enough to carry in your purse, it is not bulky around your bust-line, and it is quick and easy to make!  However, when one of my friends wanted me to knit her a scarf, only out of chunky weight (5) yarn, it just did not work with Bev's pattern. And I tried. Ran out of yarn with about 3 inches to go!

Here is my solution: Garter Stitch Bow Tie Scarf Using Chunky Weight (5) Yarn

Supplies:
Size US 8 (5.0 mm) Needles
Size US 6 or 8 Double Pointed Needles
Chunky Weight (5) Yarn - one 3.5 oz skein should be enough*

Instructions:
Cast on 2 stitches
1st Row: Increase in first stitch (I used knit front and back), K next stitch
2nd Row: Increase in first stitch, K to end of row
Repeat this row until there are 20 stitches
Work even in garter stitch (knit all) 2 more inches (total length from point is not quite 5 inches)

Loop Opening:
1st Row: * K1, slip next stitch to a double pointed needle, repeat from* across. There will be 10 stitches on the needle and 10 stitches on the DP needle to work later
2nd Row: K1, P1 (ribbing) across row
Repeat Row 2 for 9 more rows, 10 total
Place these stitches on another DP needle and break yarn 
Attach yarn by stitches being held on first DP needle work in ribbing as before for 10 row
Next Row: *K1 from the stitches being held on the DP needle, K1 from stitches being worked. Repeat from* across, 20 stitches on needle (loop opening made)

Body:
Continue to work in garter stitch for 14"

Narrow Neck:
K2tog, across row (10 stitches total)
K1, P1 across row (ribbing) for 10 rows total (narrow neck made)

K front and back across row making 20 stitches
Work in garter stitch for 2"

Shape Point:
1st Row: K1, K2tog, K across remaining stitches
Repeat  1st Row until 2 stitches remain
Bind Off

*You can see from the picture that there was not much yarn left (small ball on right)


This picture shows the Original Pattern by The Make Your Own Zone in black and the Chunky Yarn Pattern in the blue variegated yarn by Deborah Norville Collection in the color Stormy.


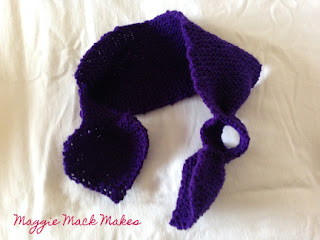
The loop opening is shown in this purple version made in DK (3) yarn. It is great that the main body of the scarf can be folded almost like a collar for those of us (me) with a shorter neck. Also you can wear the little points across your shoulder for a different look.

Hope you enjoy making either version of this scarf and if you are short on yarn you can make just one loop as in the Chunky Yarn Pattern. Send me a picture if you make one! 

Request a PDF version of the Garter Stitch Bow Tie Scarf Chunky Weight Yarn by using the Contact Form found under the Blog Archive on the right hand side of the blog near the top of the page and I will email it to you.


Friday, April 7, 2017

Easter Eggs! Natural Looking Eggs!

I wanted to make some eggs that looked more like real eggs, spotted eggs.


Warning: these are not as easy to make as the eggs in the two previous posts, but still very do-able.
And I love love love they way they look!


Supplies:
Multi-color Textured Spray Paint (I used Rust-oleum Caribbean Sand)
Plastic eggs
Matte Mod Podge
Container to mix Mod Podge
Food Color (green, blue or both)
Paint brush (not shown)
Brown or gold paint
Old tooth brush (shown below)

The textured spray paint that I used knocked the plastic eggs all over the place. Oh my! I finally found a box to corral them and painted away. This takes some time. Oh, I used two cans of paint for a dozen eggs. Not an inexpensive project if you are on a budget. Next I mixed a drop of blue food color into a small amount of Mod Podge and painted a few eggs with it. Then I mixed in a drop of green food color into the blue mix, making an aqua color and painted more eggs. Now I had three slightly different colored eggs. 


Ready to put spots on them. I used some gold paint and some brown paint (not shown). Wet the toothbrush with water and dip into the paint, then take your finger and bend the loaded bristles, aim at the eggs and let go. Spots. Let them dry and do the other side.


Hope you make some!

Easter Eggs! Second - Antiqued Foil Wrapped Eggs!

Oh so easy foil wrapped eggs. You most likely have all that is needed on hand.


All you need is a little sheet of crumpled foil, eggs, glue and black paint or shoe polish. 


You can use whatever kind of glue you have on hand - I used Elmer's school glue. Plastic eggs were my choice, mainly because I doubt that I could blow out a real egg when I can't even blow-up a balloon! Tear a piece of foil and glue to the egg.Continue tearing and gluing until the egg is completely covered. Let it dry over night or at least 12 hours. Rub some black paint on the foil then wipe most of it off using a paper towel. Let dry. Tah dah!

Next time I may try some brown or gold paint to see how that looks.


Easter Eggs! First - Découpage Eggs!

All sorts of Easter Eggs...I'm sure you will find eggactly what you want, LOL. This will be the first of three Easter egg posts.


I started with inexpensive colored plastic eggs, the ones that come apart to fill with treats, because that is what I had on hand. 


Supplies needed:
Plastic eggs
Bamboo skewers
Scissors or garden clippers 
Emmry board
Mod Podge gloss (or use Elmers school glue and water it down  - half glue, half water then mix well)
Paper napkins (I found mine at the Dollar Store)
Scotch Brite
Matte white spray paint

First, cut off the little tab that holds the two sides of the egg together. Push the egg together and then sand off the rest of the tab using the emery board. Then rough-up the entire egg using the Scotch Brite. Stick the egg on a skewer and you are ready to paint it. After painting I stuck mine in some old Styrofoam to hold it upright while drying.

Or you can skip this step and use:


I found these Decorating Easter Eggs at Walmart...much later! Duh! Would have made this project so much easier!


Now take the napkins (or you could use tissue paper) and separate the layers of the napkins using only the top printed layer. Just cut-out or tear random pieces of paper and stick on the egg using a little Mod Podge to make it stick. Then use more Mod Podge to smooth it down. With this paper I like to use the writing as the background then cut-out little motifs to add last or not.


Let dry and coat again with the Mod Podge.

Aren't they great? They look so fragile, but don't break!


These have been all over the internet for years...finding the right paper makes them yours.

Wednesday, April 5, 2017

Bunny Tea Pot

Getting ready for Easter? There are a lot of bunnies popping up around here. This one just makes me smile...


 And here is the top -


All you need are a few felt tip markers in Easter colors. Have fun being creative!


Monday, March 20, 2017

Spring Wreath

Yeah! Today is the first day of Spring! And to welcome the season I have an easy Spring Wreath for you to make. 


It was made with items that I already had on hand...so more or less for free.


I purchased the tulips several years ago from the dollar store. I think that I bought eight bunches at a dollar each, then snipped them apart using some old tin snips.The grapevine wreaths I've had for about ten years...and keep changing them to suit my mood and season. The ribbon I got at Walmart two years ago at an after Easter sale for just a dollar. There was fifteen feet of ribbon on the roll and I used it all except for about two inches. Shown in the picture below are two pipe cleaners (chenille stems) one for each wreath that I had on hand from another project. Divide the tulips and start weaving them into the grapevine base. I used seven per side, leaving about two inches for the ribbon in between (fourteen for each wreath, twenty-eight total). No glue needed!


Cut the ribbon in two equal pieces.  Make four loops of ribbon to make the bow, then cut the ribbon,  take the rest of that piece and use it for the tails on the bow. Wrap it around the loops (two on each side) and secure in the back with one pipe cleaner. Secure the pipe cleaner to the grapevine wreath. Cut the ends of the tails on the diagonal and tweak the ribbon to show some movement.


Here are the finished wreaths guarded by Tilly my Havanese guard dog. She might lick you to death! So quick and easy!