Showing posts with label Free Pattern. Show all posts

Wednesday, July 24, 2019

Christmas in July - Christmas Tree Napkin Tutorial

Would you like to learn how to make these beautiful cloth Christmas Tree napkins? I've been working on a new tutorial on how to make them including the pattern!

Here is a closeup of the green stripped one:


And a closeup of the newest one with different fabric front and back (and folded the opposite direction - just make sure the set you make is all folded the same way) Also this one is folded a little looser with the edges not completely matching.
Unfolded.

Let's make the pattern!

You will need:
16" Pizza pan or a 16" Plate
Ruler
Scissors
Pen or Sharpie Marker
Freezer Paper 


Here is a list of the dimensions:
16" or a little less, across
10" deep
Tree Trunk -
2 1/4" at the top 
2" at the bottom 
1 1/4" long
Use the pizza pan to make the round portion of the pattern on the freezer paper. Love freezer paper patterns! If I had made the pattern 8" high, it would be exactly 16" wide, but since I wanted a larger napkin at 10" wide (finished 9 1/2"), it was slightly less. Three inches from the straight edge on one side, make the tree trunk (mine is 2 1/4" at the top, 2" at the bottom, and 1 1/4" long - you can make the trunk a custom size if you like). Then cut the pattern from the paper and mark the portion to leave open when you turn the napkin. I made mine 2 1/2" from edge at the same side as the tree trunk, about 2 1/2" long.  I made several copies of the pattern to iron on the fabric, to make sure that the layout would be correct before cutting. No pins are required when you use the freezer paper and iron to the fabric. And the good news is you can use the pattern over and over!

You will need one yard of 45" fabric to make four napkins with the same fabric on both sides, more is needed for stripped fabric or fabric with an obvious one way pattern. I recommend using 100% cotton fabric. If making napkins with different fabric on each side, then one yard of each will make eight napkins. Save time by arranging fabric right sides together before pressing the patterns to the fabric. 

Press the patterns to the fabric then cut them out.

Now sew around each using a quarter inch seam allowance leaving an opening to turn.


Notice how the seams are sewn at the corners - completely across to the edge. Clip at the top of the tree trunks as shown above.
h

Press seams to the darkest fabric pressing the corners as shown below. 


For crisp corners fold as above and turn. Press again right side out.

Monday, January 28, 2019

Valentine's Day

How I Love Valentine's Day!

Do you love it, too, or is it just another day? It is odd because I'm not really all that fond of heart motifs, for example: on a shirt or jewelry. But I still love Valentine's Day. No idea why....

Today's post is a roundup of old Valentine ideas.

Heart shaped cinnamon rolls - the complete post here. Yum-o!
Next is this fluffy easy to make Valentine Wreath, made with coffee filters! The complete tutorial is here. This is the third year I've displayed these, outside no less, and they still look great.

Just a quick book heart...so sweet! It only takes thirty pages to make this.  Link to the original post here. Or directly to the tutorial here.


Be sure to check out the Sweetheart Tatted Heart post with a FREE pattern to make it here.

More soon...
XOXO

Saturday, January 26, 2019

Sweetheart Tatted Heart

Needle Tatted Hearts for Valentine's Day!


Love these little tatted hearts, and I hope you do, too. They are so easy...it only takes a couple of hours to make each one. 


Made some simple coasters with a felt base and a heart that had not been stiffened.
This is the proto-type - in the final version I've changed the middle of the heart to 4-4 (originally 8-8).

Here are all the supplies that you need to make the hearts. It makes this craft very affordable. I got my needle sizer and tatting needles through Amazon. The Red Heart crochet thread (#10) at Walmart, also available on Amazon. The Stiffy was purchased from Joann's. You will need scissors and a paintbrush which you might already have as I did...the Silpat from my kitchen, but waxed paper or freezer paper would work just as well. The crochet needle I only used when learning to tat. Magnifying glasses help you see those tiny stitches!

Update 4/22/2022, the pattern has been corrected. 


To save the pattern, just right click on the picture and download to your computer, from there you can print it.
There are several YouTube posts that will show you how to tat. This is my favorite one: Needle Tatting Basics by RustiKate

Happy Tatting!

Tuesday, November 21, 2017

Falling Leaves Pillow Cover Tutorial

Let's make a pillow and pillow cover, this one for Fall. Don't you just love those colorful silk leaves? I found some two years ago at the dollar store and bought two packages (50 leaves per package). I've used them to decorate - sticking them in wreaths and such. Time to try something different. Introducing the Falling Leaves Pillow.


First I decided on the size pillow I wanted - mine was finished size twenty by ten. Eleven inches by twenty-one inches, including half inch seam allowance, using my handy dandy pattern made from freezer paper.  I love this stuff. Make the pattern, put the plastic side down on your material, iron it with your iron set to the temperature appropriate for the fabric. No pins needed, you just cut around the pattern then pull it off. 


And you can use the pattern again and again! How neat is that? For the pillow form cut two front pieces from neutral fabric, I used an old sheet. Sew around the edges using a half inch seam except for a four inch opening. Stuff it with fiberfill or the inside of an old pillow and then sew it shut. No one but you will see this so don't worry about stains or finishing the edge.

Now cut the front and two backs (11 inches by 12 inches) out of the fabric you have chosen for the pillow cover. How did I decide how to place the silk leaves? I threw them on the floor! (smile)


Then used a section of that for placement on the front fabric piece. Using basting spray I placed the leaves how I wanted or you can just pin them in place before sewing. 


Using my sewing machine, I zig-zaged around each. You could also sew around each leaf using a straight stitch.


Hem one side of each of the two back pieces along the short edge of the fabric. Press the edge a scant quarter of an inch, fold it over again, press again and then stitch.


Finish the cover using french seams. Put wrong sides together and pin for the first seam. From the picture below you can see how the back pieces come together with the hem in the middle of the cover.


Stitch a small seam using your presser foot window (slot where the needle goes through the foot) as a guide. Stitch straight off the fabric with your stitches. At each corner you should have stitching that makes a little square. 


For crisp corners fold as below and turn entire cover to the wrong side. Press seams and then stitch all the way around again a little wider than the existing seam.


Turn using the crisp corner technique.


You are done! I added a little hand embroidery for the stems. By the way the pillow shown below has been washed in cold water twice, the first time by hand and the second in the machine on delicate cycle. I have a dog and the pillow cover is off white...need I say more?


More pillow covers and ideas to come!


Friday, May 12, 2017

Garter Stitch Bow Tie Scarf in Chunky Weight Yarn

I was going to wait until early fall to do this post, but it has been so cold and wet here that it might just be the thing. Plus I bet this would be lovely in a linen blend or cotton yarn. Sometimes you find a skein of yarn that you really love, but there is only one, or all the skeins have a different lot number. So you just get one skein. Finding a pattern for it is always a challenge. 

Thanks to Bev at The Make Your Own Zone and her Garter Stitch Bow Tie Scarf this is my go-to pattern for Aran (4) medium weight yarn. I have also made it from DK (3) light weight yarn, it worked great.  And there are so many things to love about this scarf, it  is small enough to carry in your purse, it is not bulky around your bust-line, and it is quick and easy to make!  However, when one of my friends wanted me to knit her a scarf, only out of chunky weight (5) yarn, it just did not work with Bev's pattern. And I tried. Ran out of yarn with about 3 inches to go!

Here is my solution: Garter Stitch Bow Tie Scarf Using Chunky Weight (5) Yarn

Supplies:
Size US 8 (5.0 mm) Needles
Size US 6 or 8 Double Pointed Needles
Chunky Weight (5) Yarn - one 3.5 oz skein should be enough*

Instructions:
Cast on 2 stitches
1st Row: Increase in first stitch (I used knit front and back), K next stitch
2nd Row: Increase in first stitch, K to end of row
Repeat this row until there are 20 stitches
Work even in garter stitch (knit all) 2 more inches (total length from point is not quite 5 inches)

Loop Opening:
1st Row: * K1, slip next stitch to a double pointed needle, repeat from* across. There will be 10 stitches on the needle and 10 stitches on the DP needle to work later
2nd Row: K1, P1 (ribbing) across row
Repeat Row 2 for 9 more rows, 10 total
Place these stitches on another DP needle and break yarn 
Attach yarn by stitches being held on first DP needle work in ribbing as before for 10 row
Next Row: *K1 from the stitches being held on the DP needle, K1 from stitches being worked. Repeat from* across, 20 stitches on needle (loop opening made)

Body:
Continue to work in garter stitch for 14"

Narrow Neck:
K2tog, across row (10 stitches total)
K1, P1 across row (ribbing) for 10 rows total (narrow neck made)

K front and back across row making 20 stitches
Work in garter stitch for 2"

Shape Point:
1st Row: K1, K2tog, K across remaining stitches
Repeat  1st Row until 2 stitches remain
Bind Off

*You can see from the picture that there was not much yarn left (small ball on right)


This picture shows the Original Pattern by The Make Your Own Zone in black and the Chunky Yarn Pattern in the blue variegated yarn by Deborah Norville Collection in the color Stormy.


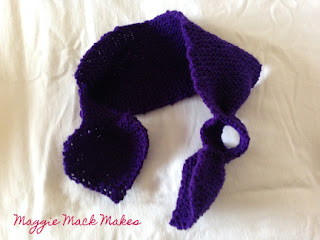
The loop opening is shown in this purple version made in DK (3) yarn. It is great that the main body of the scarf can be folded almost like a collar for those of us (me) with a shorter neck. Also you can wear the little points across your shoulder for a different look.

Hope you enjoy making either version of this scarf and if you are short on yarn you can make just one loop as in the Chunky Yarn Pattern. Send me a picture if you make one! 

Request a PDF version of the Garter Stitch Bow Tie Scarf Chunky Weight Yarn by using the Contact Form found under the Blog Archive on the right hand side of the blog near the top of the page and I will email it to you.